
I grew up with a classic GameBoy, squinting at the monochrome display with a patented cabbage hue, fiddling with the adjustable contrast, and sampling the great selection of Nintendo games. But when 1991 rolled around, I had my eyes on a new system: The Sega Game Gear. Unfortunately, my powers of persuasion weren't enough to convince my parents to purchase a second handheld gaming system, and I was too young to earn the money myself.
Years later, I hopped on eBay and found myself looking at used Game Gears. Unfortunately, they weren't the most robust of consoles, and they tended to wear out in several ways. As with a lot of electronics, the major failure points were the capacitors. They tend to rupture after some time, and the electrolytic fluid in the capacitors can cause further damage and corrosion to nearby components.
Also, sometimes bugs get inside and lay eggs and die.
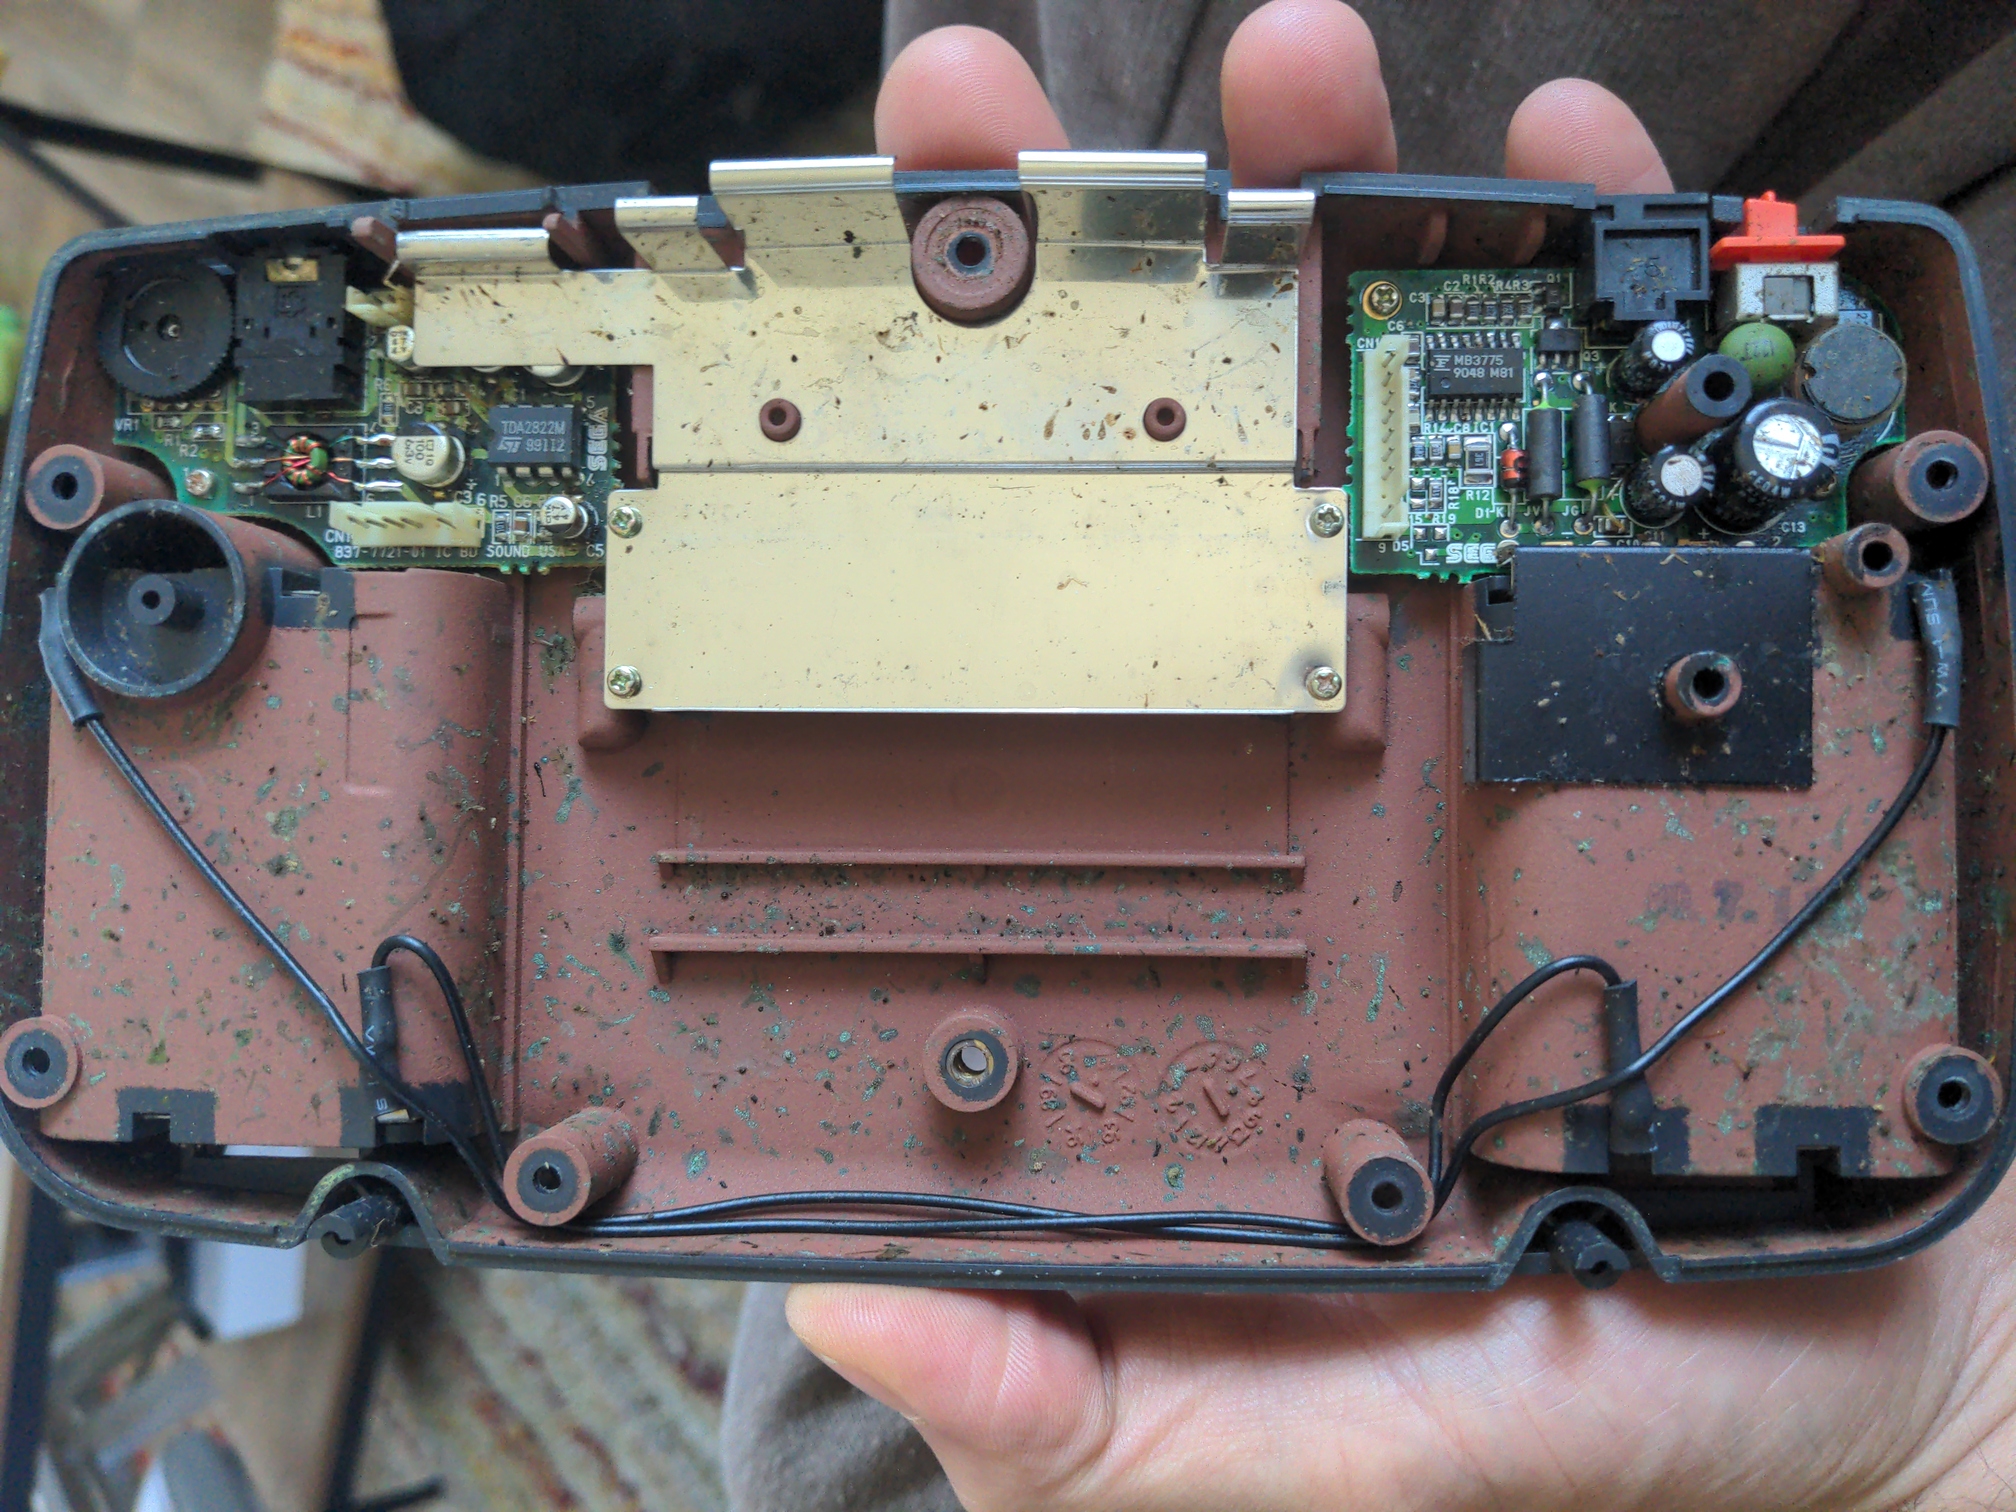
The good news is that I picked up this Game Gear for next to nothing. The bad news is that it was home to some sort of small winged insects and had numerous ruptured capacitors. Fortunately, there are a number of options available for recap kits for this hardware. In a nutshell, recapping is just the process of removing all the original capacitors, cleaning any leftover electrolyic fluid/residue, and then installing new capacitors. Production quality has gone up quite a bit over the past 20+ years, so a batch of newer capacitors is likely to last longer than the originals (making this a worthwhile endeavor).

With the Game Gear board removed, I was able to assess the capacitors. Most showed signs of leaking (which was expected) but I replaced all of them as recommended. Unfortunately the original capacitor form factor is slightly different from what's available these days, so I had get a bit creative. The through-hole capacitors were easy enough, but the surface-mount capacitors needed a bit of massaging to get into place. You can also see the original LED backlight arrangement in this photo.
However, I wasn't satisfied with just a recap. My theory is that anytime I'm pulling something completely apart and rebuilding it, I might as well update everything I can. So, I did a bit of research (Adam's Vintage Computer Restorations was a particularly helpful resource) and decided on the following upgrade options:
The Game Gear was a battery-devouring monster back in its day. It ran on 6 AA batteries, which proivded about 4 hours of playtime. This was highly dependent on the LCD brightness (the backlight used a high voltage driver to power a CCFL tube) so upgrading to a more modern LCD would improve the battery life slightly. Still, that's a lot of AAs to carry around, and I wanted something better.

I sourced a power board and battery packs from RetroSix. They promise substantially more battery life (up to 13 hours, or 3x the original life granted by 6x AAs) and they can be charged while installed from a standard USB-C charger. The battery packs themselves are pretty easy to install - just remove the original battery terminals and slightly trim the plastic spacers between the batteries (I'm pointing to the trimmed sections with my tweezers).
The power board was a required upgrade if I wanted the upgraded batteries. But that was a reasonable sacrifice, because it also saved me some time doing recap work on the original power board. In this picture, you can see the board on the righthand side of the enclosure (this was just a test fit, before I did any substantial cleaning).
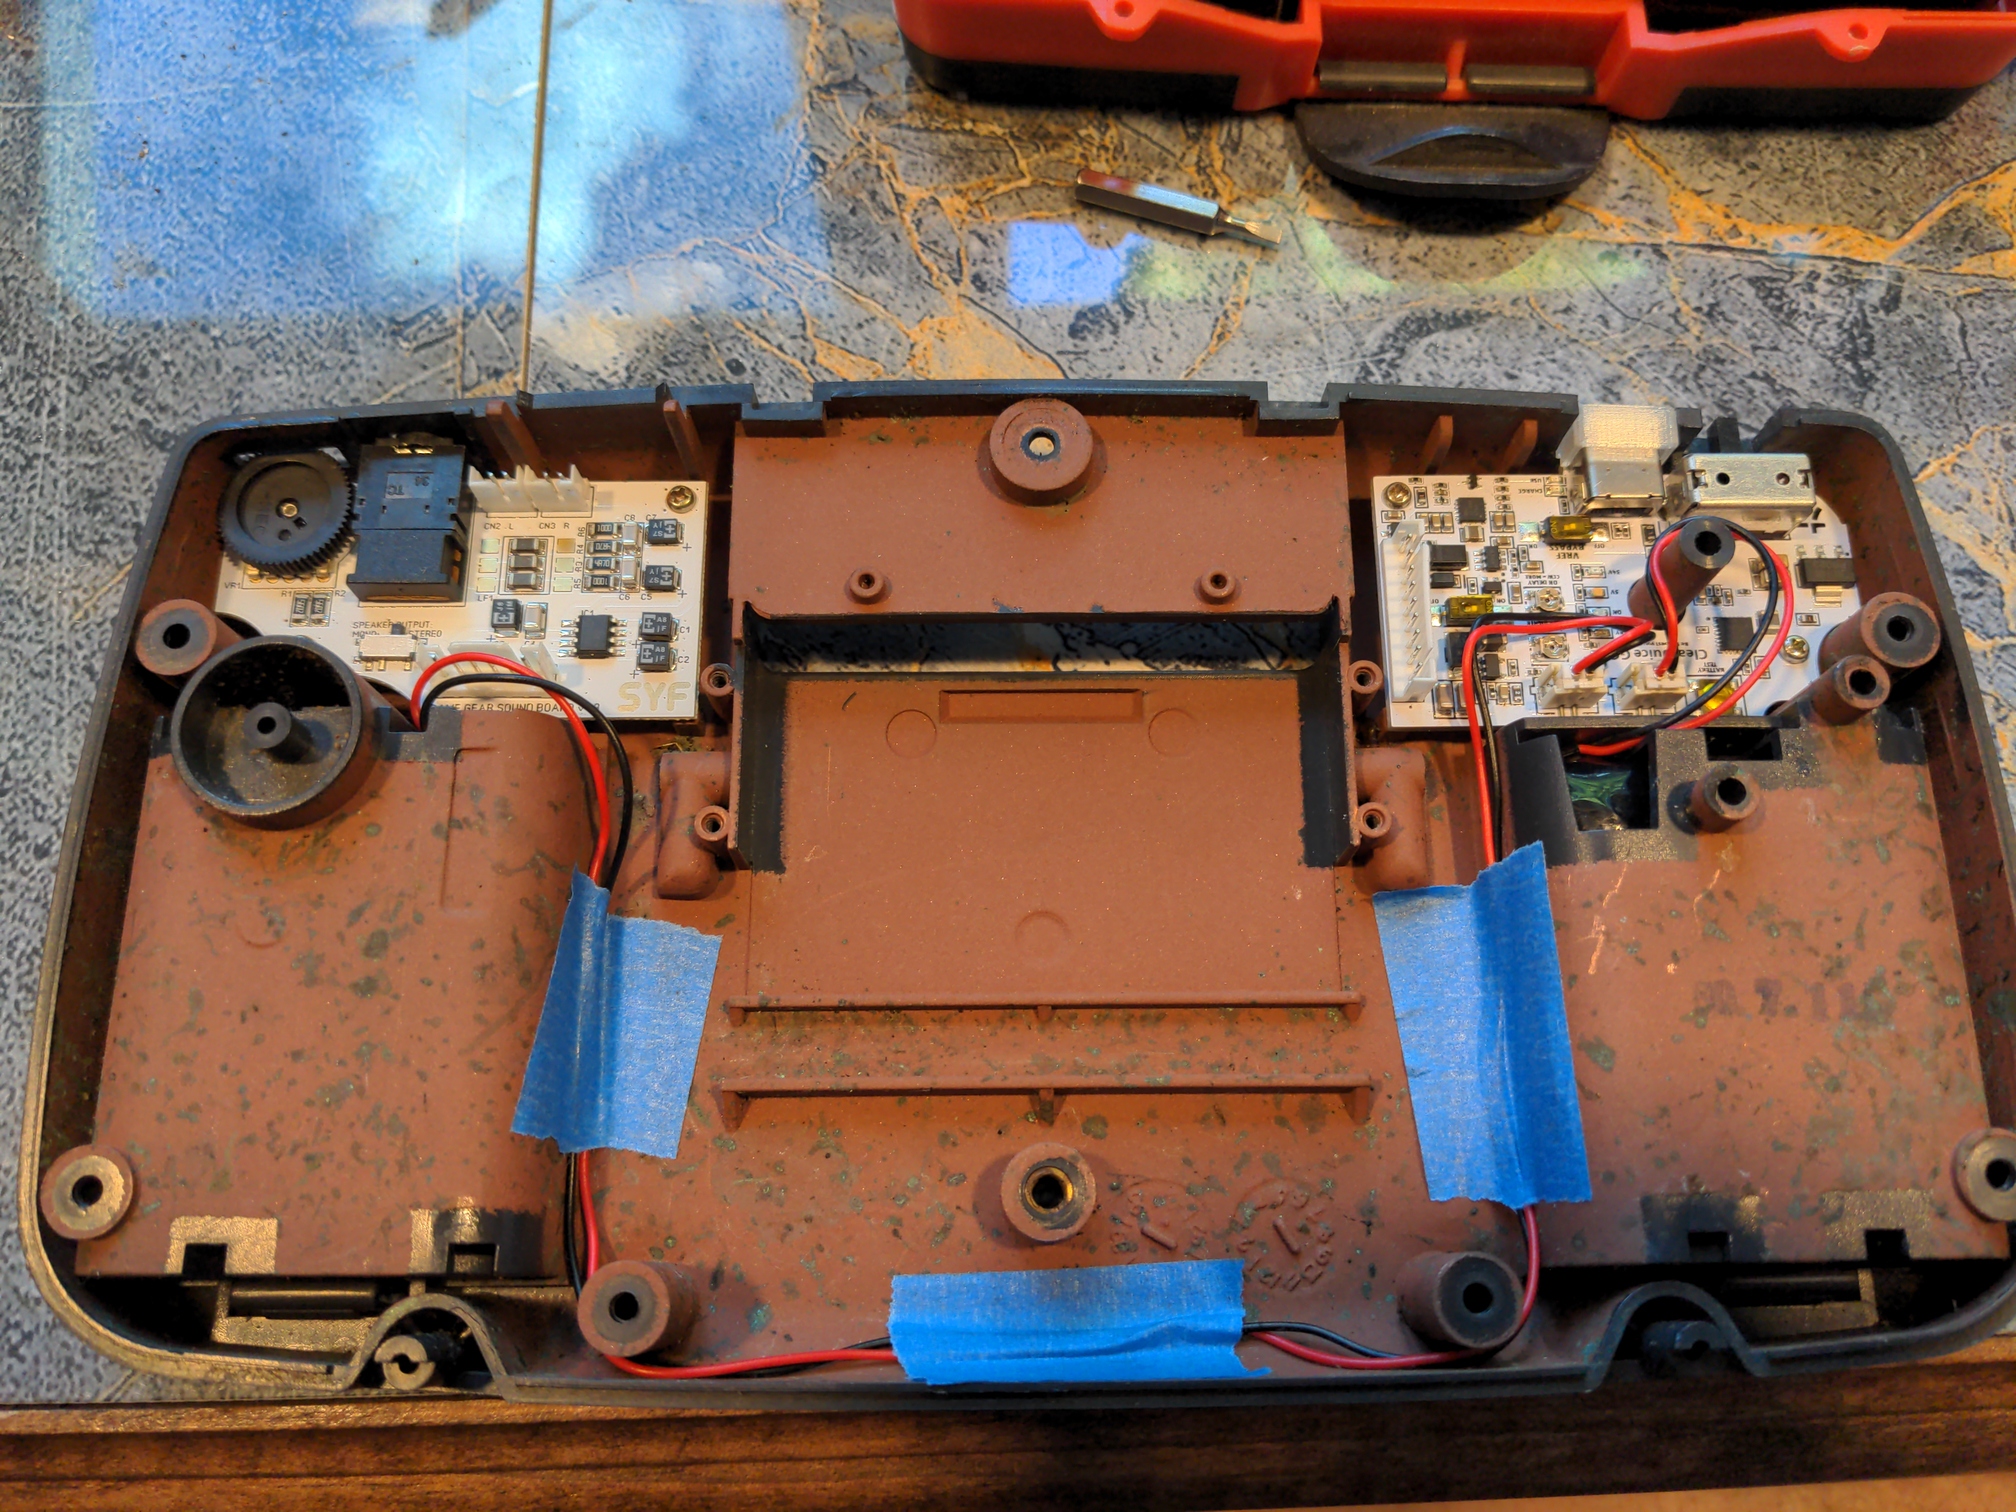
You can get a sense of the wire routing for the batteries here. I used some painter's tape to quickly rough out the wire routing, and came back later with some adhesive to keep the wiring tied down and out of the way. You can also see a clever little insert piece to adapt the USB-C port to the opening used by the original barrel jack (the Game Gear did support a direct DC connection to run on wall power or a portable rechargeable battery pack, but I didn't want a tethered handheld).
This piece also came from RetroSix, and allows for stereo audio (through the headphone jack, or through two speakers if you have a shell that supports a second speaker). Again, saved some time with the recap work here, and the part is much higher quality and provides better audio output on the headphone jack. This was the easiest part of the rebuild, as it's a direct replacement for the original board and doesn't require any modification to the shell.
The Game Gear's original color LCD screen was pretty awesome (especially for me, with my original GameBoy grey-on-green) but it has some failings after 30+ years. Notably, the backlight is a CCFL tube with a reflector to channel light up through the screen, but that led to uneven lighting and other visual artifacts.
This is the original LCD, which surprisingly still worked. However, you can see how dim the screen is (this is maximum brightness). If you zoom in, you can see some blacklight bleed as the lighter sections in the black areas surrounding the screen. Playable, but really hard to see in bright or well-lit areas. Forget about playing outside! And of course there's a lot of bug detritus still in there, which is kind of gross to look at.

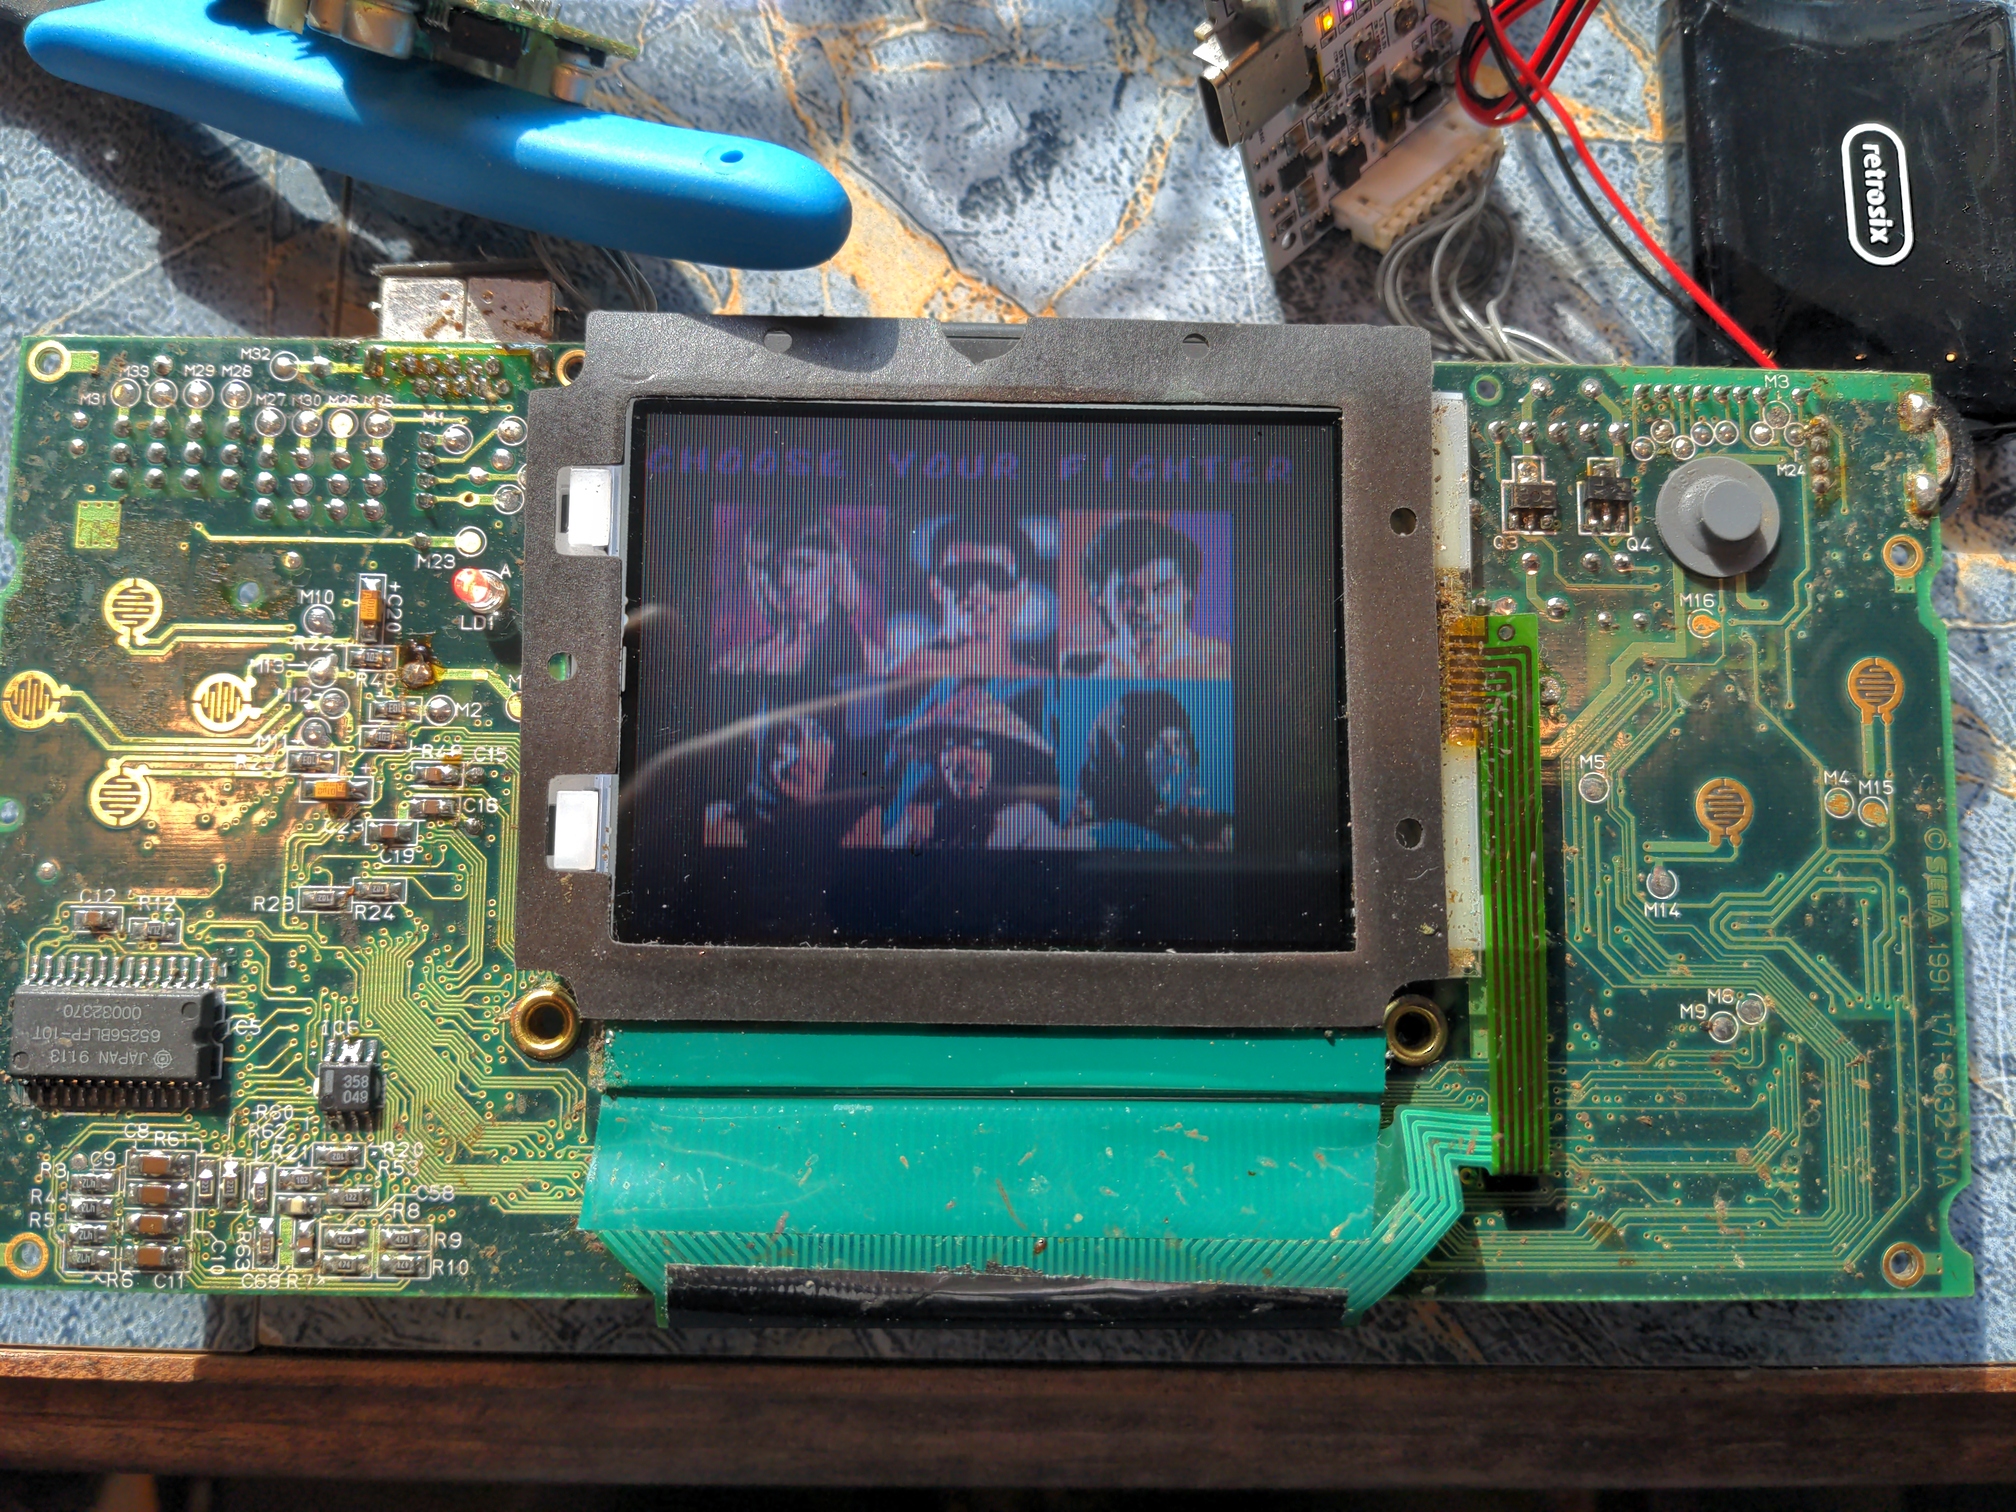
Here's the new LCD installed. Note the ribbon cable; this kit requires soldering a ribbon cable to key points on the main board. You can see how tiny the contact points are along the bottom edge; tricky work! Again, I used a bit of painter's tape to hold everything in place temporarily while working, and later replaced that with some more permanent adhesive tape. The especially cool thing here is the long thin strip that runs parallel to the left side of the screen. This allows button inputs to control screen behavior. This screen offers various display modes which more closely emulate the original screen appearance. Specifically, you can set various scaling modes and enable scan lines for a more authentic feel. Regrettably I didn't take a side-by-side comparison between the original LCD and the IPS replacement.
I sourced this from BennVenn and as of the time of writing it's the only IPS screen offered for the Game Gear. The big benefit of IPS screens versus LCD is the incredible viewing angle. I don't have to hold the screen directly perpendicular to my line of sight anymore, which is a huge improvement!
So what's this look like assembled?
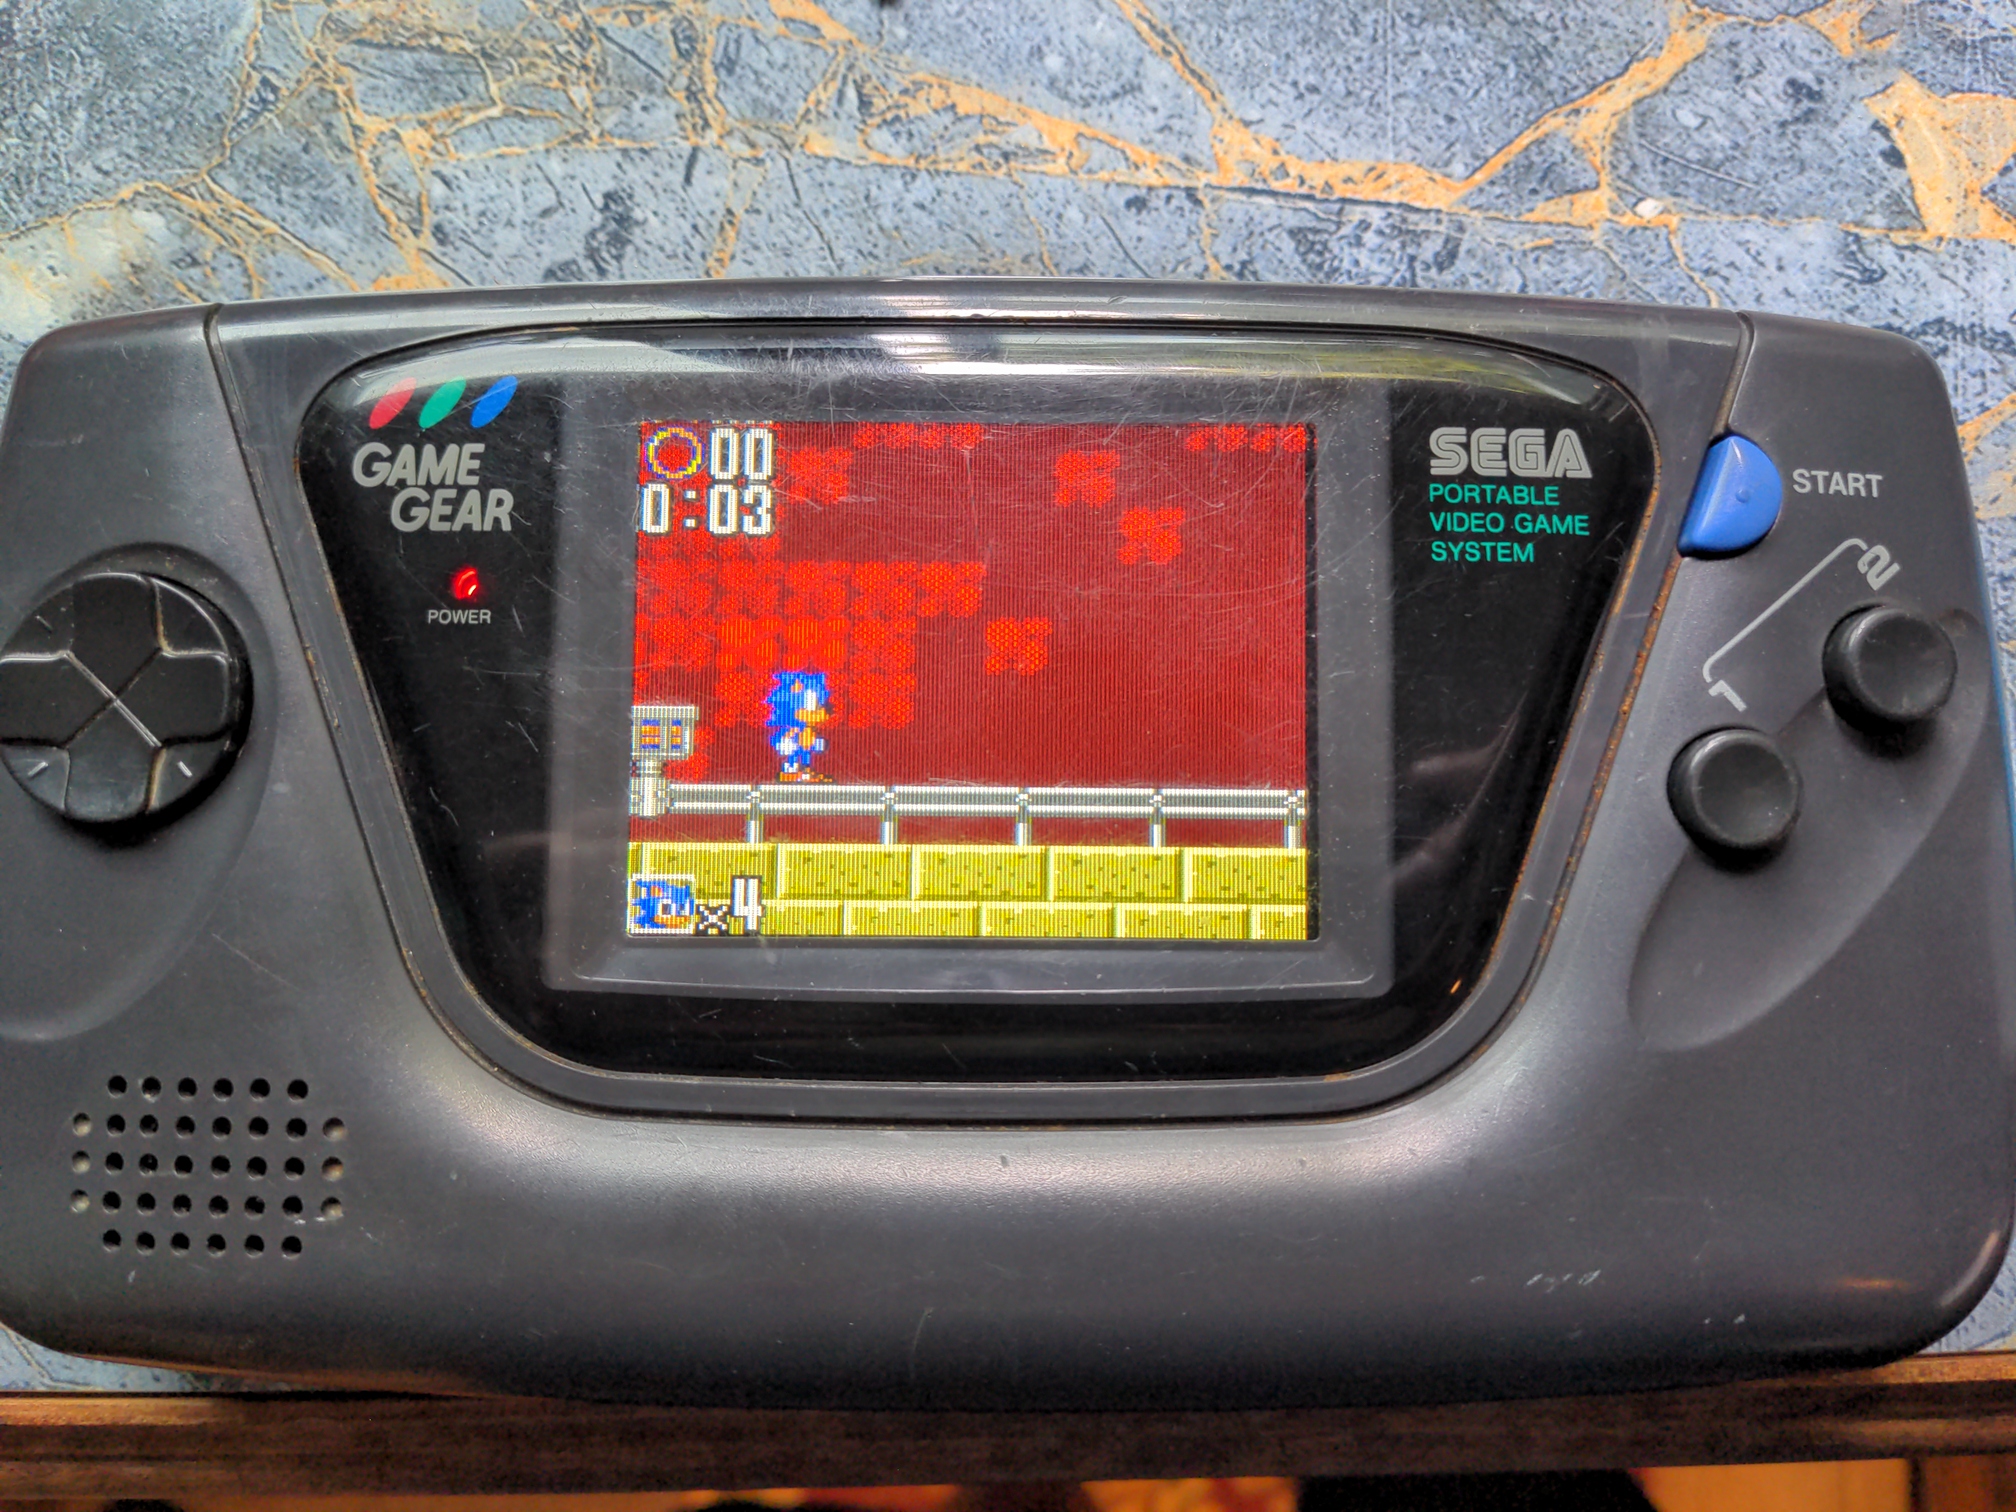
Here's everything back in the original shell. I still have some cleaning to do (this was my initial test fit) but I'm debating buying a custom shell to replace the worn original. Either way, I'll definitely pick up a replacement front lens, as the original lens is pretty scratched up. I did try experimenting with some polishing compound (it actually looked far worse when I got it) but a replacement lens is about $8 so I didn't want to waste too much time trying to save this one. I still need to do a final partial teardown and clean the shell a bit better, but the good news is that everything works!
Can't wait to travel with this thing. It's surprisingly comfortable!
Website coded by Delta Sierra, all content copyright Delta Sierra (unless otherwise noted). Hosting provided by Neocities.